Make a cake in adobe illustrator

Today Im going to show you how to make a cake like this in adobe illustrator.(sorry I havent uploaded anything in a while)
Youtube Video Tutorial click here
STEP 1 2 ovals
use the ellipse tool to make 2 ovals like this, 1 above the other

STEP 2 Use direct selection tool
now click on the direct selection tool on the left tools panel(the arrow that is gray)
click on the circle, click on the top anchor(blue line at top of circle) and press erase(backspace), you should now have a half a circle(do that for both circles)

STEP 3 Make half circle join
Use the direct selection tool and select the right tip of each half circle and use Shift to select both circle
here's how you do it, click on 1 of the half circle, then hold down shift and click on its right tip, while still holding down shift key click on the other half circle to select it, and then click on its right tip too
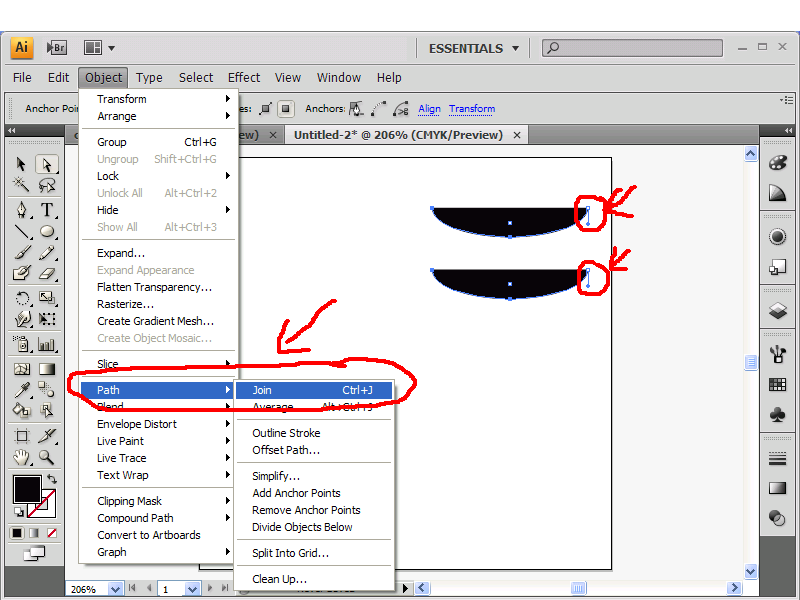
now go to object path and join, they should now join and look like this

STEP 4 create and add an oval on top
Just like the oval that you did before make one again and add it to the top and it should look like this

STEP 6 starting the fun part with the gradients
select the bottom part the one which was joined and add a gradient to it on the right panel, and click on swatches and then click on radial gradient

drag out the gradient menu on the right panel
USE WHATEVER COLOR YOU WANT I USED PINK
(dont let go of it or it will just change the gradient to pink)
select the pink color(#EC008C) and drag it on to the black arrow on the gradients panel

Now add another pink color of ur choice to the white arrow on the gradients
if you want to use mine, heres how you do it
select the swatches menu on the right panel, then click on the icon that looks like 2 folders at the bottom and then, go to foods and then to sweets

now select the pink(#F49AC1) shown on the picture below
and then hold it and drag it onto the white arrow,

STEP 7 add a stroke
select the bottom part the one that was joined and then click on stroke at the bottom left of the screen and double click on it and type in F59DB2 for color

now just select the top oval and just use the eyedropper and click on the bottom part with the gradient to make it look like the bottom part

now the top oval should already be selected, so hold down the shift key and click on the bottom part of the cake the one that was joined, now both should be selected
right click and group and now they should become one and now you just created the top layer of the cake

STEP 8 make copies
make a copy of the group of circle u just made and make the copy a little bigger
select the copy, right click, arrange and send to back
you now have a second layer of cake, place the second layer under the 1st layer

now just make a copy of the second layer and make it a little bigger and, right click, arrange, send to back
now place the 3rd layer you just made under the second layer

Now its time to decorate
STEP 9 decorate
I used a brush to make the white design u see, but I downloaded the brush heres a link if you want to decorate it like mines
(this isnt my brush its uploaded by someone else)
when u have downloaded and installed everything, use any brush you want i used the art brush 23 and then used the paintbrush to draw a line and add it to each cake layer like this

NEXT i drew a heart and added it to the second layer just draw a heart using the paint brush and then use the eye dropper and give it the same color as the cake
NEXT the word LOVE use any font to make it I used english font here's the link
im going to teach you a trick to added gradients to the font
select your font, then click to change stroke to none, the little square with red line going through at the bottom left below the fill
your font should be invisible since it doesnt have any fill or stroke, go to appearance on the right panel, and click on the upside down arrow(its circled in blue in the bellow picture) then add new fill

you font should come back black
now on the appearance menu click on the blue upside down arrow and u should now see the swatches of colors to choose from click on the radial gradient same as the one used at the beginning of tutorial
KEEP THE GRADIENTS MENU OPEN AND DRAG IT OUT LIKE I DID

click on swatches library menu(looks like 2 folders) then go to foods and then ice cream

now u should see colors to choose from , select the pink, the first one you see on the second row and drag and drop it on the black arrow on the gradients menu

NEXT decorate the top the way you want I used a bow
I dont know if your adobe illustrator has it but you can check by
going to the symbols menu right next to the swatches panel, then click on the 2 little folders at the bottom and then click on celebration and select the red bow

BE WARNED, its red, mines is pink because I edited it to make it pink, by double click it and click OK, then right click and click ungroup and adding pink that I wanted from the swatches panel, doing this would be another tutorial so Im sorry but I cant show you how to do it right now but u can do it urself its just changing the fills to pink by just click on the pink you want nothing hard
YOUR ALL DONE
your cake should look like this, if not then do back and start over

0 comments:
Post a Comment