Make 3d smiley face in adobe illustrator
Today's tutorial is making a 3d smiley face in adobe illustrator

1. Circle
create a simple circle like in the pic and give it a radial gradient on the swatches panel

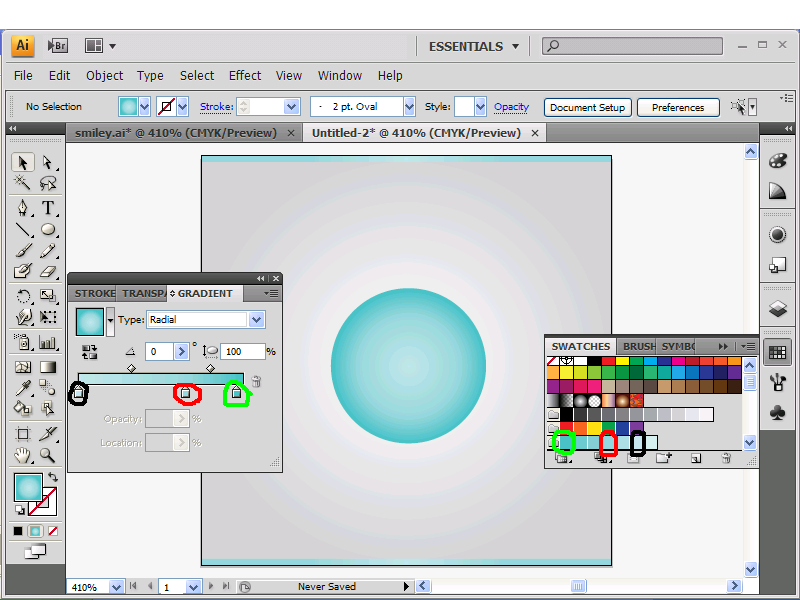
now open the gradient menu like in the pic below along with the swatches panel

2. Gradient colors
go to the swatches library(the 2 little folders on the swatches panel at the bottom) see pic

now click on the swatches library, go to nature, then beach
there should be a bunch of colors to choose from that shows up on a new menu
your gonna see a folder next to each group of colors, the group that is circled in red in the below pic, click on the folder next to it

close out of the beach menu, the group a blue colors should now be added to the swatches panel like below circled in green

now your going to make your gradient for the circle look like mines. The color that is highlighted is for the arrow that is highlighted with the same color.
3. make the eyes
start of with 2 eyes using the ellipse tool to draw it. Give the eyes a fill of light blue. I used the lightest blue thats from the group of colors we used earlier.

now select those to circles and make a duplicate of each. Place each copy like in the pic below.
select the 2 copies and give them a radial gradient going from dark grey(circled in red below) to black

now make another copy and make it a little smaller, give it a white fill, and place it in the eye like the below pic

4. Mouth
Make a circle and click on the top portion of the circle with the direct selection tool(dont worry about the fill of the circle yet).

now click on the top portion of it and delete it, it should like a half circle(below pic)
and place the mouth where it should be

select the mouth and give it a radial gradient going from light blue to medium blue using the colors from the group of blue colors(see pic)

now select the mouth, copy and paste it and give the copy a black fill
place the copy in the same position as in the below pic(in front the gradient colored mouth)
5. Cheeks
now to make the cheeks you can either draw it with a brush or just make a circle like i did, give it no fill, give it a black stoke, use direct selection tool to delete portions of it, and rotate it in the proper position matching the below pic

6. Teeth
just make a copy of the mouth , give the copy a white stroke, and make the copy a little smaller like in the pic
and place one set of teeth at the top and another set at the bottom

now just draw a line and give it a light gray stroke, to separate each teeth and make it seem realer like in the pic below

7. Tongue
make a copy of the mouth and give it a 3 radial gradient going from red, to dark red, and back to the same red

your done now your smiley should look like this


5 comments:
Thanks a lot for the lovely tutorial
Amazing, this is a great Post.Clipping Path Associate, is one of the best Clipping path service provider around the world. We offer our global customers: image masking, clipping path, background removal service, shadow creation Service, Jewelry Photo, Retouching Services, Color Correction Service, Image e-commerce business Service…
I am quite happy visiting your page. Thanks for effective tips..keep it up.
Clipping Path
Wow, very good step by step demonstration. Very well explained tutorial. I'm also working on different clipping path platform for my image editing work. Your tips help in my work as well. Very informative sharing. Thanks for sharing, please sharing more. I'll definitely visit your blog again.
clipping path
Thank you for your valuable information. Photo Retouching Services
Post a Comment