Make Restaurant Logo

Today's blog I will show you how to make a company logo like this

 I WOULD HIGHLY RECOMMEND YOU PURCHASE THIS BOOK
you get every adobe software help and the book explains how to use it, Without these books I would not understand adobe
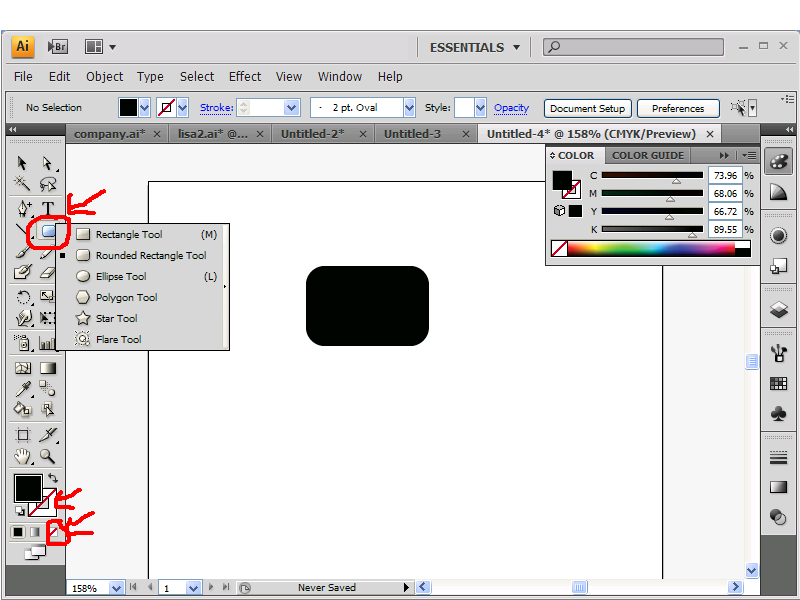


1. Round rectangle

Make a rectangle just like the picture by going to the left panel and click on round rectangle

If you dont know how to make a round rectangle, go to the menu button shown in the picture below the T

Remember to set the stroke to none, the stroke is at the bottom left, to set it to none just click on the little square that has a red line going through it. (see pic below for example)


2. add gradient

I gave a tutorial about how to use gradients,

Just drag out the gradient menu located at the right panel and keep the swatches menu open (see pic below)

then click on the radial gradient(see pic) and then select the dark blue(see pic) drag it to the black arrow, and then select the light blue and drag it to the white arrow(see pic)

Your circle should change from black fill to a blue gradient fill like the below pic


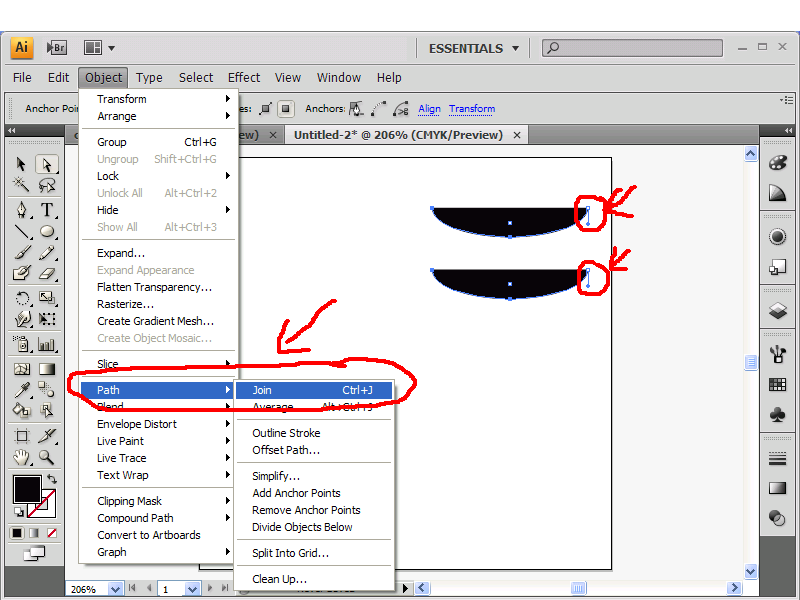
3. Erase parts of rectangle

Your now going to erase parts of the rectangle, go to the erase tool on the left panel(see pic) and then click on it and erase parts of the rectangle to make the rectangle become 3 seperate parts

Hold down the shift key to erase in a straight line

now select the left part move it a little close to the middle

now select the right part and move it a little close to the middle


4. Add a curved line

Use the brush tool to draw a curved line, the curved line should look like the pic below and set its stroke to the same dark blue like before


5. Font trick

This is a trick to add to whatever font you used

I used Sony Sketch font, I downloaded it but you can use whatever font you want
Download Here

Now for your first font, type out cuisine or you can use whatever name you want

then click on the font and set it stroke to none and its fill, it should now become invisible
go to the appearance menu on the right panel(see pic) it looks like a circle with a black fill

then after that click on the upside down arrow with the lines by it on the right of the menu, then click add new fill(see pic)

then on the add new fill click on the blue upside down arrow and then on the radial gradient like the one from before
and drag and drop the same colors used from before light blue and dark blue for the

remember dark blue goes on the black arrow
light blue goes on the white arrow


Now where going to type the word international using whatever cursive hand writing font you have, I used
choping script which I download
download here

Rememeber type I in capital and the rest lower case

give the word international a medium blue fill, its next to the light blue fill from before(see pic)


6. Add the flames

Type the letter S, I used the font Myriad pro and give it a  blue fill any way you like then click on it and right click and arrange and send to back

make 2 copies and you should now have 3 S remember to send them to back and place them on top of the middle part of the round rectangle(see pic)


You logo should look like this below here


Adobe Illustrator Cs4 - Complete Product - 1 User - Retail - Pc

Download Free Company Logos

 Click on Download to get link to download, Remember you need Adobe illustrator if dont have it I suggest you purchase it


1. Cake Logo

 Download

2. Drink Logo


3. Leaf Logo


4. Disco

5. Dog


Company Logos

Today's Blog is about some of my logo creations, Feel free to show me your creations

Everything I make is from scratch, nothing is copied

1.  Life Is like a disco

Its not really a company logo I just made this for fun. I created this in adobe photoshop, believe it or not but for me to make this I started off with a square.


2. Chow Wow

This is I gave a tutorial about how to draw the dog I made this from scratch and used circles and brushes, look at the tutorial to learn how to make it.


3. Drink water love life

I used gradients and played with the direct selection tool to make the water drop. The heart was drawn from scratch. For the water drop I started of with a oval.


4. Drink Water Love life part 2

I did this the same way as number one, all I did differently was try to add text effects.


5. Justin Taylor Photography

Not really difficult to make this, all I did was use the scissors to erase a part of the circle and added an arrow.


6. Open Dining Network

I drawn a circle and use the direct selection tool to erase the left portion of it and added some gradients.


7. Legends Realty

I used to triangles and just erase parts from it. Easy to do.


8. Kapsel Coffee

Making the coffee mug was kinda tricky. Its alot of circle put together to make it. I used 2 different fonts for this.


9. Thank a farmer

This had to be the most tricky one. The reason for that Is because it was hard making the fruits. All I was thinking about was circles cause thats what is mostly used.


10. Pangea

This one didnt really take much to make

11. Pangea part 2

Its basically the same from before 


12. Green Island


For this I used a leaf that came with adobe illustrator and just placed them in unique places


13. Cake Shoppe


I created this little shop from scratch and everything In it.


14. Metro Kitchen

This was just a logo for a kitchen company


15. Nurish Cafe

This is a logo for a healthy food company, I used a leaf and edited it to give it the look I wanted


16. The Lux(wine bottle design)

If you look closely this is a hallway for the picture on the right


17. Drink Water Love Life

These are my 2 favorite drink water logos, I used photoshop for the font effects, the heart is suppose to be a water splash.

18. Wine Solutions

Its a wine company logo, I used this creative brush on the side of the line.


Make a cake in adobe illustrator


Today Im going to show you how to make a cake like this in adobe illustrator.(sorry I havent uploaded anything in a while)

Youtube Video Tutorial click here

STEP 1 2 ovals

use the ellipse tool to make 2 ovals like this, 1 above the other


STEP 2 Use direct selection tool

now click on the direct selection tool on the left tools panel(the arrow that is gray)

click on the circle, click on the top anchor(blue line at top of circle) and press erase(backspace), you should now have a half a circle(do that for both circles)


STEP 3 Make half circle join

Use the direct selection tool and select the right tip of each half circle and use Shift to select both circle

here's how you do it, click on 1 of the half circle, then hold down shift and click on its right tip, while still holding down shift key click on the other half circle to select it, and then click on its right tip too

now go to object path and join, they should now join and look like this


STEP 4 create and add an oval on top

Just like the oval that you did before make one again and add it to the top and it should look like this


STEP 6 starting the fun part with the gradients

select the bottom part the one which was joined and add a gradient to it on the right panel, and click on swatches and then click on radial gradient


drag out the gradient menu on the right panel

USE WHATEVER COLOR YOU WANT I USED PINK

(dont let go of it or it will just change the gradient to pink)
select the pink color(#EC008C) and drag it on to the black arrow on the gradients panel


Now add another pink color of ur choice to the white arrow on the gradients

if you want to use mine, heres how you do it

select the swatches menu on the right panel, then click on the icon that looks like 2 folders at the bottom and then, go to foods and then to sweets


now select the pink(#F49AC1) shown on the picture below

and then hold it and drag it onto the white arrow,


STEP 7  add a stroke

select the bottom part the one that was joined and then click on  stroke at the bottom left of the screen and double click on it and type in F59DB2 for color


now just select the top oval and just use the eyedropper and click on the bottom part with the gradient to make it look like the bottom part


now the top oval should already be selected, so hold down the shift key and click on the bottom part of the cake the one that was joined, now both should be selected

right click and group and now they should become one and now you just created the top layer of the cake


STEP 8 make copies

make a copy of the group of circle u just made and make the copy  a little bigger

select the copy, right click, arrange and send to back

you now have a second layer of cake, place the second layer under the 1st layer


now just make a copy of the second layer and make it a little bigger and, right click, arrange, send to back

now place the 3rd layer you just made under the second layer


Now its time to decorate


STEP 9 decorate

I used a brush to make the white design u see, but I downloaded the brush heres a link if you want to decorate it like mines
(this isnt my brush its uploaded by someone else)

when u have downloaded and installed everything, use any brush you want i used the art brush 23 and then used the paintbrush to draw a line and add it to each cake layer like this

NEXT i drew a heart and added it to the second layer just draw a heart using the paint brush and then use the eye dropper and give it the same color as the cake

NEXT the word LOVE use any font to make it I used english font here's the link
 im going to teach you a trick to added gradients to the font

select your font, then click to change stroke to none, the little square with red line going through at the bottom left below the fill

your font should be invisible since it doesnt have any fill or stroke, go to appearance on the right panel, and click on the upside down arrow(its circled in blue in the bellow picture) then add new fill


you font should come back black

 now on the appearance menu click on the blue upside down arrow and u should now see the swatches of colors to choose from click on the radial gradient same as the one used at the beginning of tutorial
KEEP THE GRADIENTS MENU OPEN AND DRAG IT OUT LIKE I DID


 click on swatches library menu(looks like 2 folders) then go to foods and then ice cream


 now u should see colors to choose from , select the pink, the first one you see on the second row and drag and drop it on the black arrow on the gradients menu


 NEXT decorate the top the way you want I used a bow

I dont know if your adobe illustrator has it but you can check by

going to the symbols menu right next to the swatches panel, then click on the 2 little folders at the bottom and then click on celebration and select the red bow


BE WARNED, its red, mines is pink because I edited it to make it pink, by double click it and click OK, then right click and click ungroup and adding pink that I wanted from the swatches panel, doing this would be another tutorial so Im sorry but I cant show you how to do it right now but u can do it urself its just changing the fills to pink by just click on the pink you want nothing hard

YOUR ALL DONE

your cake should look like this, if not then do back and start over