Make Restaurant Logo
Today's blog I will show you how to make a company logo like this
I WOULD HIGHLY RECOMMEND YOU PURCHASE THIS BOOK
you get every adobe software help and the book explains how to use it, Without these books I would not understand adobe
1. Round rectangle
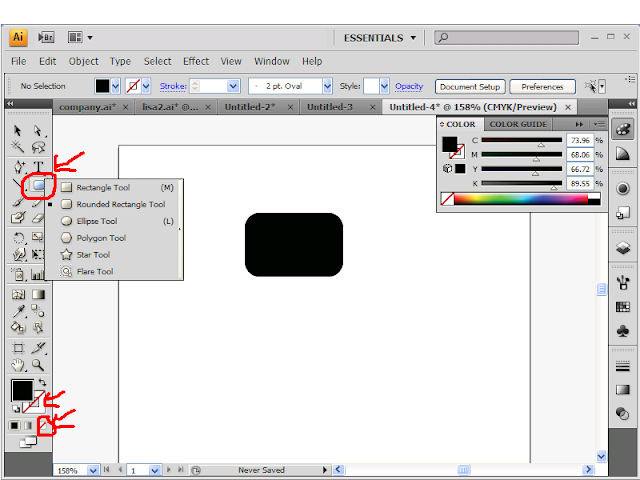
Make a rectangle just like the picture by going to the left panel and click on round rectangle
If you dont know how to make a round rectangle, go to the menu button shown in the picture below the T
Remember to set the stroke to none, the stroke is at the bottom left, to set it to none just click on the little square that has a red line going through it. (see pic below for example)
2. add gradient
I gave a tutorial about how to use gradients,
Just drag out the gradient menu located at the right panel and keep the swatches menu open (see pic below)
then click on the radial gradient(see pic) and then select the dark blue(see pic) drag it to the black arrow, and then select the light blue and drag it to the white arrow(see pic)
Your circle should change from black fill to a blue gradient fill like the below pic
3. Erase parts of rectangle
Your now going to erase parts of the rectangle, go to the erase tool on the left panel(see pic) and then click on it and erase parts of the rectangle to make the rectangle become 3 seperate parts
Hold down the shift key to erase in a straight line
now select the left part move it a little close to the middle
now select the right part and move it a little close to the middle
4. Add a curved line
Use the brush tool to draw a curved line, the curved line should look like the pic below and set its stroke to the same dark blue like before
5. Font trick
This is a trick to add to whatever font you used
I used Sony Sketch font, I downloaded it but you can use whatever font you want
Download Here
Now for your first font, type out cuisine or you can use whatever name you want
then click on the font and set it stroke to none and its fill, it should now become invisible
go to the appearance menu on the right panel(see pic) it looks like a circle with a black fill
then after that click on the upside down arrow with the lines by it on the right of the menu, then click add new fill(see pic)
then on the add new fill click on the blue upside down arrow and then on the radial gradient like the one from before
and drag and drop the same colors used from before light blue and dark blue for the
remember dark blue goes on the black arrow
light blue goes on the white arrow
Now where going to type the word international using whatever cursive hand writing font you have, I used
choping script which I download
download here
Rememeber type I in capital and the rest lower case
give the word international a medium blue fill, its next to the light blue fill from before(see pic)
6. Add the flames
Type the letter S, I used the font Myriad pro and give it a blue fill any way you like then click on it and right click and arrange and send to back
make 2 copies and you should now have 3 S remember to send them to back and place them on top of the middle part of the round rectangle(see pic)
You logo should look like this below here
Adobe Illustrator Cs4 - Complete Product - 1 User - Retail - Pc


0 comments:
Post a Comment